TL;DR:
- Proper emblem prep, including thorough cleaning with IPA and lint-free materials, ensures long-lasting overlay adhesion.
- Patience during surface cleaning and verification prevents common mistakes like residual wax or lint that cause lifting or bubbles.
- Investing extra time in prep guarantees a smooth, durable overlay finish that enhances vehicle appearance.
You spent time picking the perfect design, you ordered your overlay, and then it happened: bubbles under the vinyl, a corner lifting after a week, or that frustrating hazy look where the overlay just won't sit flat. Nine times out of ten, the problem isn't the overlay itself. It's what happened before you applied it. Getting your Subaru or Ford emblem surface genuinely clean and ready is the unglamorous step that separates a crisp, long-lasting result from one that looks worse than stock. This guide covers every tool, every step, and every trap to avoid so your overlay goes on perfectly the first time.
Table of Contents
- What you need: Tools and materials for emblem prep
- Step-by-step: Prepping your emblem surface
- Common mistakes and troubleshooting
- Checking your prep: Ready for overlays?
- What most guides miss about prepping emblem surfaces
- Upgrade your ride with premium overlays
- Frequently asked questions
Key Takeaways
| Point | Details |
|---|---|
| Right tools matter | Using lint-free cloths and IPA wipes ensures the emblem surface is clean for overlays. |
| Stepwise prep prevents failure | Following a detailed cleaning process stops bubbles and peeling overlays. |
| Dry surface is critical | Overlays only adhere well to completely dry, residue-free emblems. |
| Avoid quick fixes | Slowing down and double-checking each stage leads to professional-quality results. |
What you need: Tools and materials for emblem prep
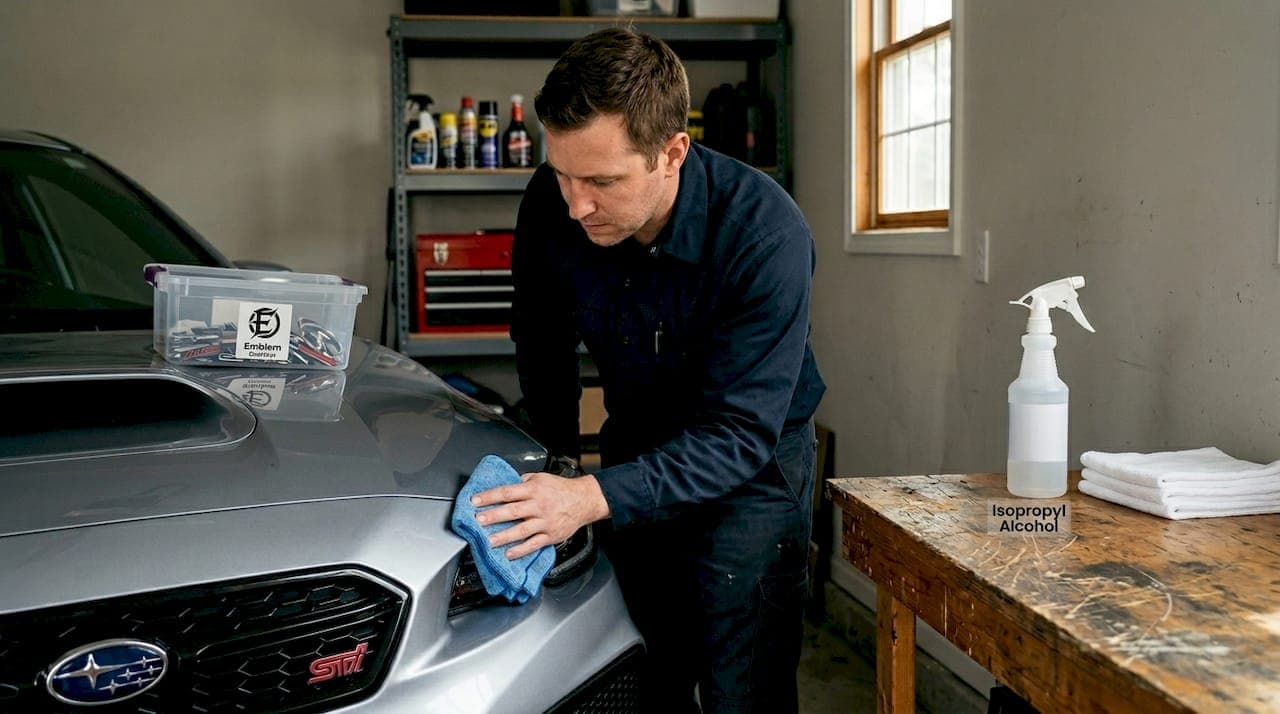
With the goal in mind, it's important to know what you'll need before you start prepping your emblems. The good news? You don't need a garage full of equipment. You need the right equipment, and you need to use it correctly.
The non-negotiables are IPA wipes, lint-free cloths, and microfiber towels. Isopropyl alcohol (IPA) is the star of the show here. It dissolves oils, grease, and wax residues without leaving behind any film or moisture that could compromise adhesion. Lint-free cloths are equally important because regular cotton rags or paper towels shed tiny fibers, and those fibers become trapped under your overlay, creating tiny bumps you'll see in direct sunlight. Microfiber towels are ideal for the initial wipe-down to remove loose dust and grime before you reach for the IPA.
Mild detergent is optional but worth having on hand. If your emblem has a visible layer of road grime, bird droppings, or built-up wax from a recent car wash, a small amount of dish soap diluted in water lets you pre-clean without risking the emblem's finish. You'll still follow up with IPA regardless. For pre-cleaning emblems that have seen several seasons of road use, a mild wash step can make the IPA stage far more effective.
Additional items for trickier situations:
- Plastic trim tool or soft plastic blade: Useful for gently scraping stubborn wax buildup from emblem crevices without scratching painted or chrome surfaces
- Nitrile gloves: Keep your hand oils off the freshly cleaned surface after you wipe with IPA
- A bright flashlight or work light: Lets you spot streaks, lint, or moisture before the overlay goes on
- Compressed air (optional): Blows out dust from emblem edges and recessed lettering
Here's a quick reference for what each tool does and when you'll use it:
| Tool | Purpose | Required? |
|---|---|---|
| IPA wipes or pads | Remove oils, wax, and residues | Yes |
| Microfiber towels | Remove loose surface dirt and dust | Yes |
| Lint-free cloths | Final dry wipe before overlay | Yes |
| Mild dish detergent | Pre-clean heavy grime buildup | Optional |
| Plastic blade | Remove stubborn wax from edges | Optional |
| Nitrile gloves | Prevent hand oils from recontaminating | Recommended |
| Work light | Inspect surface for streaks or lint | Recommended |
Pro Tip: Always use lint-free materials from start to finish. Even a single fiber from a cotton rag can leave a bump under your overlay that catches the eye every time you look at your car.
Check our overlay maintenance tips for advice on keeping your emblems looking sharp long after application day.
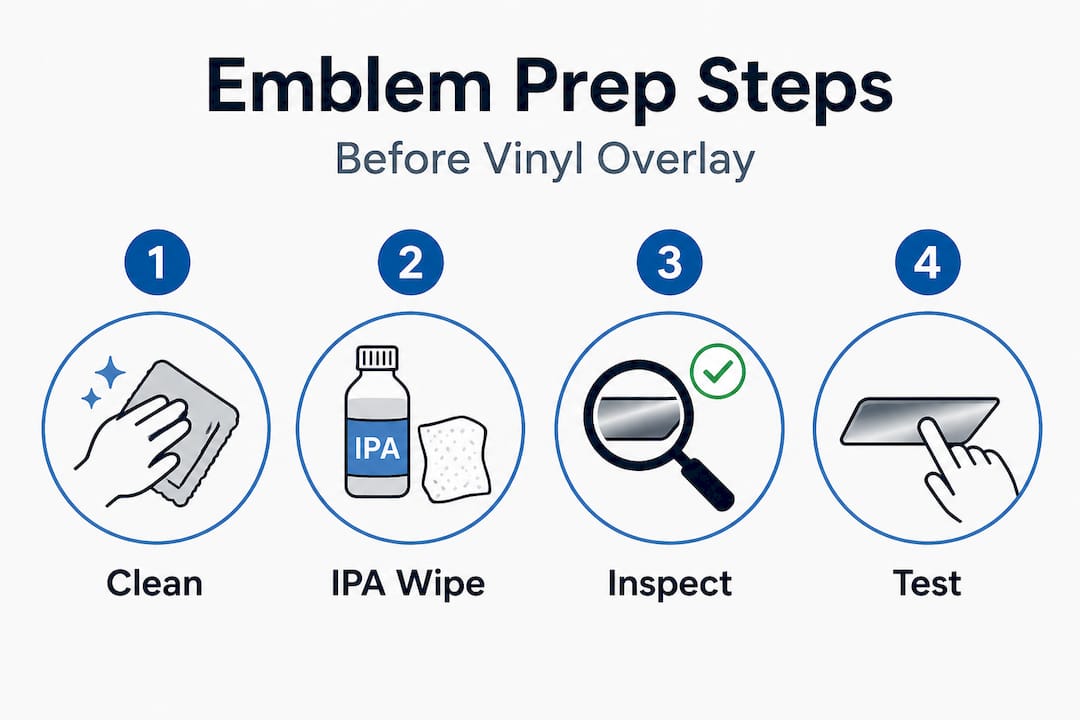
Step-by-step: Prepping your emblem surface
Once you have the right materials ready, follow these clear steps to prep your emblem surface. The order matters. Skipping steps or swapping their sequence is exactly how you end up with trapped grime under your overlay.
-
Start with clean hands and a good workspace. Wash your hands thoroughly or put on nitrile gloves. Find a shaded spot away from direct sunlight, which causes IPA to evaporate too fast and can dry your overlay adhesive prematurely before you position it. A garage or carport on a mild day is ideal. Avoid working in humidity or cold below 60°F since both affect adhesion.
-
Remove loose surface dirt first. Take your dry microfiber towel and gently wipe the emblem surface to pick up dust, loose debris, and anything sitting on top. Don't scrub. You're not cleaning yet, just clearing the field. This step keeps you from grinding abrasive particles into the emblem during the deeper cleaning stages.
-
Apply mild detergent if needed. If the emblem has visible wax haze, heavy buildup, or sticky residue, mix a tiny drop of mild dish soap with water and apply it to a lint-free cloth. Gently wipe the emblem surface and edges. Rinse with a clean damp cloth, then dry completely with a fresh microfiber towel. Don't skip the drying step. Any moisture left behind will fight your IPA wipe and cause adhesion issues later.
-
Wipe with IPA. This is the most critical step. Open your IPA wipes or pads and wipe the entire emblem surface in smooth, overlapping strokes. Pay close attention to edges, corners, and the areas right where the emblem meets the paint or grille. These spots collect wax and grease without you realizing it. Use a fresh wipe if yours gets visibly dirty before you've covered the whole emblem.
-
Let it fully air dry. After the IPA wipe, give the surface one to two minutes to evaporate completely. IPA dries fast, but you want zero residual moisture. Don't touch the surface once it's clean.
-
Apply your overlay immediately after drying. Once the surface is confirmed clean and dry, you're on the clock. Dust settles fast, so move directly into your vinyl overlay application without delay.
Caution: Never use harsh household cleaners, acetone, or strong solvents directly on factory Subaru or Ford emblems. These can strip paint, cloud chrome finishes, and damage the textured surfaces that give OEM badges their depth. Stick to mild detergent and IPA only.
If you drive a Ford specifically, the Ford badge prep workflow walks through emblem-specific nuances for popular models like the F-150, Bronco, and Mustang where badge contours vary and edge prep matters most.
Common mistakes and troubleshooting
Even with great preparation, some common mistakes can sabotage your efforts. Here's what to watch out for, and more importantly, how to fix it if it happens.
Mistake 1: Not removing wax or polish before prepping. Many enthusiasts detail their cars regularly, which is great for paint but terrible for overlay adhesion. Wax creates an invisible slick layer that prevents the overlay adhesive from bonding to the emblem surface. If you waxed your car in the last few weeks, assume there's wax on your emblem and treat it accordingly with a dedicated wax remover or extra IPA passes.
Mistake 2: Skipping the IPA wipe entirely. Some people wipe the emblem down with a damp cloth and call it done. That's not enough. Water lifts dirt but doesn't dissolve oils or wax. Without the IPA step, grease and residue stay on the surface, and your overlay will lift from those spots within days of application. The IPA prep step is non-optional for lasting adhesion.
![]()
Mistake 3: Using regular towels or paper towels. Standard cotton towels and even most paper towels leave microscopic lint behind. Under a clean overlay on a dark emblem, you'll notice those tiny fibers as small bumps. Stick to microfiber towels for wiping and lint-free cloths or proper IPA pads for the final clean.
Mistake 4: Applying the overlay on a surface that's still wet or dusty. This sounds obvious, but it's easy to rush. If you see any sheen from moisture or IPA still sitting on the surface, wait. If you're working outdoors and dust has settled after your wipe, redo the IPA wipe before applying the overlay. For advice on preventing overlay damage over the long term, the right start is just as important as ongoing care.
Additional pitfalls to avoid:
- Touching the emblem with bare fingers after the IPA wipe
- Working in direct sunlight where IPA evaporates too quickly
- Using the same wipe pad for multiple passes when it's already loaded with grease
- Applying overlays in cold temperatures below 60°F where adhesive won't bond properly
- Forgetting to clean the very edges of the emblem where it meets surrounding surfaces
Our practical emblem overlay guide goes deeper into application technique once your surface is ready.
Pro Tip: Before you commit to applying your overlay, run a clean fingertip along the very corner of the emblem edge. If it feels the least bit tacky, greasy, or you see a smudge on your finger, do another IPA wipe. Corners are the first place overlays start to lift.
Checking your prep: Ready for overlays?
Once you've finished prep, it's essential to check your work to guarantee overlay success. A few quick checks take less than two minutes and can save you from a redo that takes much longer.
Step 1: Visual inspection. Hold your work light or flashlight at a low angle and look across the emblem surface. You're looking for streaks, water spots, IPA residue, or any particles sitting on the surface. A properly prepped emblem should look completely matte and even. Any sheen means moisture or residue is still present.
Step 2: Touch test. Very gently touch a corner of the emblem with a gloved fingertip. The surface should feel smooth and dry with zero tackiness. If you feel any roughness or stickiness, clean again. Even slight unevenness suggests residue or lint.
Step 3: The paper test. Take a clean sheet of regular printer paper and press it flat against the emblem for two seconds, then lift. If the paper comes away clean with no smudge, no moisture mark, and no lint transfer, your surface is ready. If you see anything on the paper, address it before applying your emblem overlay.
Step 4: When in doubt, redo the IPA wipe. Seriously. One extra wipe costs you 60 seconds. A lifted overlay costs you a new overlay and another hour of work.
Here's a simple reference table to confirm readiness:
| Check | Not ready | Ready |
|---|---|---|
| Visual: streaks or sheen | ❌ Residue visible | ✓ Completely matte |
| Visual: particles on surface | ❌ Lint or dust present | ✓ Perfectly clean |
| Touch: feel of surface | ❌ Tacky or rough | ✓ Smooth and dry |
| Paper test: residue transfer | ❌ Smudge on paper | ✓ Paper stays clean |
| Moisture: any dampness | ❌ Wet or cool to touch | ✓ Fully room-temperature dry |
For more insight on getting your Subaru or Ford badge looking exactly how you want it, check out these emblem personalization tips before you peel and press.
What most guides miss about prepping emblem surfaces
Here's something worth saying plainly: most guides rush you. They list the steps, tell you to use IPA, and then jump straight to the exciting part about applying the overlay. What they skip is the psychological shift that actually separates enthusiasts who get great results from those who repeat the whole process twice.
The real issue isn't tools or technique. It's patience. Most overlay failures happen because someone did 90% of the prep correctly and then got impatient at the last 10%. They applied the overlay when the emblem was still slightly damp. They skipped the visual inspection because it "looked fine." They touched the surface with a bare finger and didn't notice the smudge. Every one of those is a five-second shortcut that costs real money.
We've seen this pattern repeat with Subaru and Ford enthusiasts across every experience level. The beginner rushing because they're excited. The experienced DIYer rushing because they assume they already know the result. Both make the same mistake. Both get the same lifted corner three days later.
The uncomfortable truth is that the prep stage deserves at least as much focus and time as the overlay application itself. A clean, dry, wax-free emblem surface is genuinely more important than perfect application technique. You can finesse an overlay onto a perfectly prepped surface. You cannot save an overlay from a greasy one.
Slowing down at every stage, waiting an extra minute for IPA to fully evaporate, checking edges twice, doing a paper test before you peel the backing on your custom emblem overlays, that five minutes of patience is what determines whether you're admiring your work or pulling off a bubbled overlay in a week.
Upgrade your ride with premium overlays
With your emblem surface primed and verified, the next step is choosing the right overlays to complete your custom look.
A perfectly prepped surface is the best canvas you can give a quality overlay, and it deserves a design worth the effort. At Emblem Inlays, we make vinyl emblem overlays built specifically for Subaru and Ford factory badges. Choose from hundreds of designs including all 50 state flags, bold graphics, and clean color options that transform your badge into a genuine statement. Every overlay is cut to fit your factory emblem precisely, so when it goes on a clean, dry, properly prepped surface, it sits perfectly and stays that way. Visit Emblem Inlays to browse the full collection, or explore options specifically designed to enhance your vehicle's look with handcrafted emblem inlays that stand out from stock.
Frequently asked questions
Why is IPA preferred for prepping emblem surfaces?
IPA removes oils and residues without leaving streaks or film, making it the most reliable option for getting a surface truly adhesion-ready before applying a vinyl overlay.
Can I use household cleaners instead of IPA?
Household cleaners often contain surfactants and fragrances that leave invisible residues or react with factory emblem finishes, so IPA wipes are strongly recommended over any general-purpose cleaner.
How long should I wait after cleaning before applying an overlay?
Give the surface at least one to two minutes after the final IPA wipe, confirming it's fully dry and at room temperature before you peel and apply the overlay.
What if my overlay still peels after careful prep?
Check for trapped wax under the surface or missed oily spots, then remove the overlay, redo the IPA wipe, and reapply with fresh attention to corners and edges where adhesion failures typically start.
Recommended
- Vinyl emblem overlay guide: personalize your Subaru or Ford
- How to clean emblems before overlays for lasting adhesion
- Subtle car customization with vinyl emblem overlays 2026
- How overlays enhance your car's look with vinyl emblems
- Pro-Level PPF Installation Tips for Flawless Results – AEONCUT PPF Pre-cut Cutting software