Your Subaru or Ford rolled off the lot looking exactly like every other one on the road. Same badge, same finish, zero personality. If that bothers you even a little, you're not alone. Vinyl emblem overlays are one of the fastest-growing ways to personalize your vehicle without drilling, painting, or voiding anything. They sit right over your factory emblem, transform the look instantly, and come off cleanly whenever you want a change. This guide walks you through every stage: why overlays beat the alternatives, what tools you need, the full application process, how to fix mistakes, and the most creative design ideas available right now.
Table of Contents
- Why choose overlays over paint or removal?
- What you need: Tools, materials, and preparation
- The stepwise emblem overlay process: Step-by-step instructions
- Troubleshooting, verification, and aftercare
- Showcase: Creative customization ideas for Subaru and Ford emblems
- Find the best overlays and start customizing
- Frequently asked questions
Key Takeaways
| Point | Details |
|---|---|
| Easy customization | Vinyl overlays allow Subaru and Ford owners to personalize emblems easily and reversibly. |
| Stepwise application | Careful preparation and following the correct steps ensure a flawless, lasting finish. |
| Non-damaging option | Unlike paint or removal, overlays do not damage your emblems or vehicle paint. |
| Creative freedom | Choose from a variety of designs, including state flags and custom graphics, for a unique look. |
| Maintenance tips | Proper aftercare extends overlay life and keeps emblems looking fresh. |
Why choose overlays over paint or removal?
When Subaru and Ford owners want to change up their emblems, they usually consider three options: paint the emblem, remove it entirely, or apply a vinyl overlay. Each approach has a very different outcome.
Painting an emblem sounds appealing until you realize it often requires removing the emblem first, masking surrounding areas, and committing to a permanent result. One slip with the brush or rattle can and you're looking at a repaint job. Emblem removal leaves a ghost outline on your paint where the badge used to sit, and that shadow can be surprisingly hard to eliminate. Overlays are non-damaging and reversible while painting requires emblem removal, making overlays the clear winner for anyone who values flexibility.
Here's a quick comparison to put it in perspective:
| Method | Reversible | Risk to paint | Skill required | Cost |
|---|---|---|---|---|
| Vinyl overlay | Yes | None | Low | Low |
| Painting | No | Medium | High | Medium/High |
| Emblem removal | Partial | Medium | Medium | Low/Medium |
Overlays win on almost every metric. They're also the best path for enhancing your car's look without any permanent commitment. A few more reasons drivers choose overlays:
- No adhesive residue left on the factory emblem when removed correctly
- Hundreds of designs available, from solid colors to state flags
- Swap them out seasonally or whenever your style changes
- No professional installation required for most designs
- The wide range of overlay types means there's something for every taste
- Long-term durability of overlays means you're not replacing them every few months
Now that you know why overlays are the preferred method, let's gather what you'll need to get started.
What you need: Tools, materials, and preparation
Getting the right materials together before you start saves you from stopping mid-install to hunt for something. Here's everything you need:
| Tool or material | Purpose |
|---|---|
| Isopropyl alcohol (70%+) | Cleans the emblem surface |
| Microfiber cloths | Lint-free wiping and drying |
| Plastic squeegee or credit card | Smoothing the overlay flat |
| Heat gun or hair dryer | Softening vinyl for curves |
| Vinyl emblem overlay | The actual design you're applying |
| Masking tape | Alignment guide |
| Trim removal tool (optional) | Helps with tight edges |
Workspace matters more than most people expect. Work in the shade or indoors. Direct sunlight heats the emblem surface and makes the adhesive grab too fast, which kills your ability to reposition. Aim for temperatures between 60°F and 80°F for the best results. A clean, dry surface is non-negotiable.
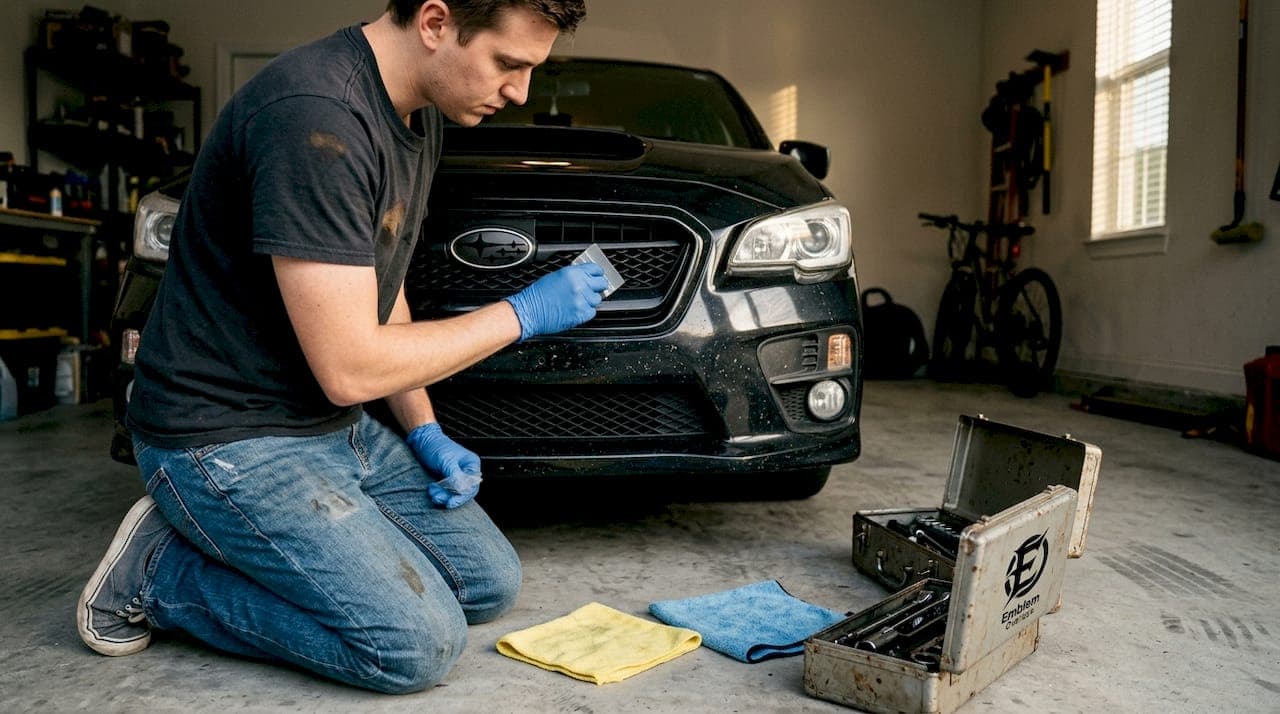
Cleaning your emblems thoroughly before application is the single most important prep step. Wax, road grime, and even fingerprints create a barrier between the adhesive and the emblem. Proper preparation is key for lasting adhesion on overlays, so don't rush this part.
Pro Tip: Before peeling any backing off your overlay, hold it over the emblem and check the fit. Make sure the design lines up with the emblem's edges and any cutouts. This dry run takes 30 seconds and saves you from a frustrating misalignment later.
With your materials ready and workspace set, you're prepared to jump into the step-by-step overlay process.
The stepwise emblem overlay process: Step-by-step instructions
A precise, methodical approach leads to flawless emblem overlay results. Follow these steps in order and don't skip ahead.
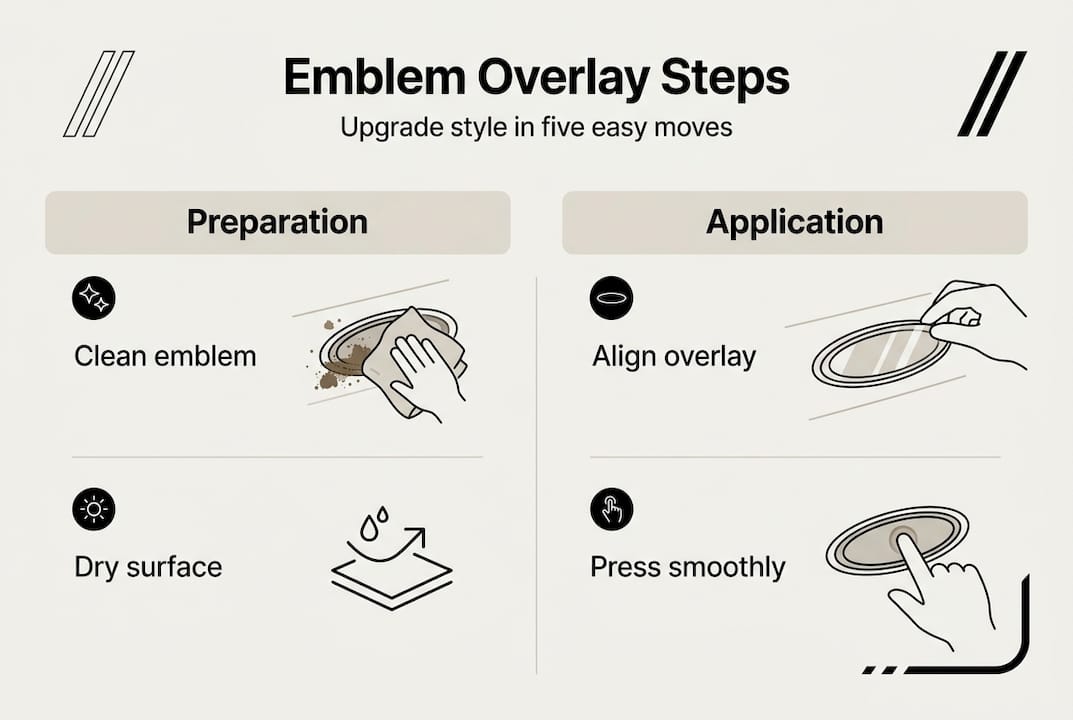
- Clean the emblem. Wipe the entire emblem surface with isopropyl alcohol on a microfiber cloth. Get into every edge and recess. Let it dry completely, at least two minutes.
- Dry and inspect. Run a clean, dry microfiber over the surface. Look for any remaining residue or moisture. A perfectly clean surface looks slightly matte, not shiny with oils.
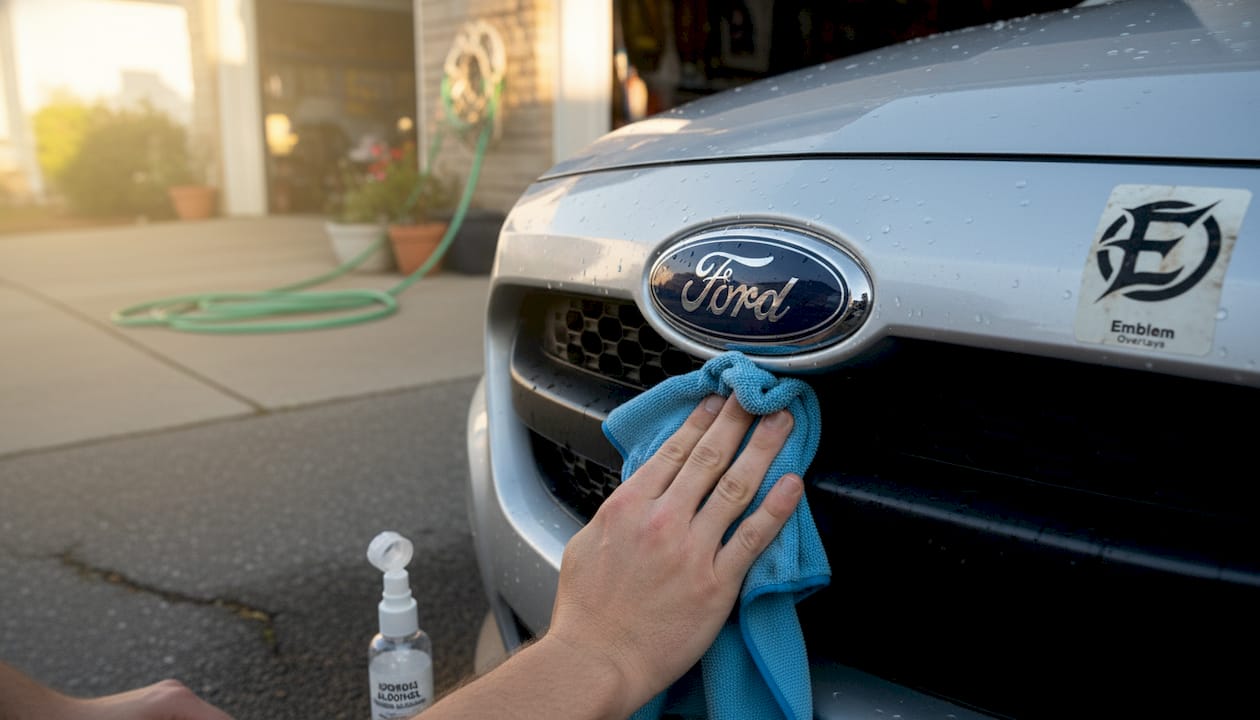
- Align the overlay. Use a small strip of masking tape as a hinge on one edge of the overlay. This lets you flip it open and closed while you check positioning without it moving around.
- Peel and apply. Starting from one edge, slowly peel the backing while pressing the overlay down with your squeegee. Work from the center outward to push air toward the edges.
- Smooth it out. Use firm, overlapping strokes with the squeegee. Pay extra attention to corners and raised emblem details. Apply steady pressure without dragging.
- Finish the edges. Press all edges firmly. If your emblem has curves or recessed areas, use a heat gun on low for five to ten seconds to soften the vinyl, then press it into shape immediately.
For state flag overlays or designs with fine detail, take your time on step four. Rushing the peel causes the vinyl to stretch unevenly. The detailed step-by-step tutorial covers Ford-specific emblem shapes in depth if you need extra guidance. You can also find subtle customization tips for keeping the look refined rather than overdone.
Pro Tip: For tight curves on Subaru badges, warm the overlay for a few seconds before applying. The vinyl becomes more pliable and conforms to the shape without creasing. Patience here is everything.
After completing the steps, it's important to check your results and address common mistakes early.
Troubleshooting, verification, and aftercare
Even careful installers run into issues. Here's what to watch for and how to fix it:
- Air bubbles: Small bubbles often work themselves out in 24 to 48 hours in warm weather. For stubborn ones, use a pin to make a tiny hole at the edge of the bubble, then press flat.
- Misalignment: If you catch it before fully pressing down, gently lift the overlay from one edge and reposition. Don't yank it.
- Peeling edges: Usually caused by oil or wax left on the surface. Lift the edge, clean underneath with alcohol, and press back down.
- Wrinkles or creases: Apply heat and smooth with the squeegee while the vinyl is warm.
Here's what a good result looks like versus a common error:
| Result | What it looks like |
|---|---|
| Correct installation | Crisp edges, no bubbles, design centered and flat |
| Misalignment | Design shifted left, right, or rotated off-center |
| Bubbling | Raised sections visible under the vinyl |
| Peeling edge | Corner lifting away from the emblem |
Warning: Don't use abrasive cleaners or scrubbing pads on your overlay. And never force an overlay into position if it's misaligned. Reseat it gently or you risk stretching the vinyl permanently.
For aftercare, hand washing is your best friend. Automatic car washes with high-pressure jets and stiff brushes can lift overlay edges over time. Avoid harsh chemical cleaners near the emblem. Inspect the edges every few months and press down any that are starting to lift. Overlays last for years with proper care and allow for removal or replacement anytime you want a fresh look.
For more ideas on protecting your investment, check out overlay protection tips and browse car emblem art ideas for inspiration on what's possible.
You're now equipped to personalize your emblem and keep it looking sharp. Let's see what cool creative options are possible.
Showcase: Creative customization ideas for Subaru and Ford emblems
Once you know how to apply overlays, the real fun begins: choosing your design. Overlay options can include flags, gradients, reflective finishes, and more for Subaru and Ford enthusiasts. Here are some of the most popular directions people take:
- State flags: Rep your home state or the state you love most. Texas, California, Florida, all 50 are available. It's one of the most personal statements you can make on a vehicle.
- Contrast finishes: Matte black over a chrome emblem, or gloss white over a dark badge, creates a striking visual pop without being loud.
- Reflective designs: These look subtle in daylight but catch headlights at night for a dramatic effect.
- Themed sets: Match your overlays across multiple emblems on the same vehicle for a cohesive, intentional look.
- Color-matched or color-contrast: Match your vehicle's accent color or go opposite for maximum contrast.
- Gradient and fade designs: Two-tone overlays that shift from one color to another across the emblem face.
Overlays connect drivers to something personal, whether that's regional pride, a sports team, a military branch, or just a color they love. Why personalization matters goes deeper than aesthetics. It's about making your vehicle feel like yours. There are plenty of reasons to personalize emblems beyond just looks, including protecting the factory emblem surface underneath.
Ready to start your own project? Discover where to find quality overlays and inspiration next.
Find the best overlays and start customizing
You've got the knowledge. Now you need the right overlay to bring your vision to life. We design and produce vinyl emblem overlays specifically for Subaru and Ford vehicles, with hundreds of options ready to ship.
Browse our full emblem overlay selection to find designs that fit your exact vehicle and style. Whether you want a clean matte black finish, a bold state flag, or something completely unique, we have options that install in minutes and look like they belong there. We also offer handmade overlay options for drivers who want something truly one of a kind. Every overlay is made to fit your factory emblem precisely, so there's no guesswork involved. Explore the site, find your design, and make your Subaru or Ford actually yours.
Frequently asked questions
Will overlays damage my paint or emblem?
No, vinyl overlays are designed to be non-damaging and reversible when installed and removed properly, leaving no residue or marks on your factory emblem.
How long do vinyl emblem overlays last?
Quality overlays last several years with proper aftercare, including hand washing and avoiding abrasive chemicals near the emblem surface.
Can I install overlays myself, or do I need a professional?
Most Subaru and Ford owners can DIY install overlays using basic household tools, and following a clear stepwise guide makes the process straightforward even for first-timers.
What if I make a mistake during installation?
Gently peel the overlay back from one edge and reposition it before pressing fully down, since overlays can be removed and reapplied if you haven't fully committed the adhesive yet.
Are custom designs like state flags available for overlays?
Yes, overlay options include custom graphics such as all 50 state flags, gradient finishes, reflective designs, and more for both Subaru and Ford vehicles.